This Blog is to share our knowledge and expertise on Linux System Administration and VMware Administration

Friday, November 24, 2017

Phpldapadmin Renew the expired openldap user

Friday, November 24, 2017 0

Phpldapadmin  Renew the expired openldap user 

Login to phpldapadmin admin console by using Admin id & password.
Explore the ldap directory & search the user in left side
Select the user and click
Right side we can see the user property.
Update the password directly in password section.

Before changing the Shadow Last Change, the ShadowMax & ShadowWarning settings will be like below 


Update the date in Shadow change as per your policy.

 
Once changed the ShadowLastChange setting to current date, ShadowMax & ShadowWarning will change.

Note: Once you changed the password & shadow Last Change settings click update objects. Then only above change will take effect.

Update or Recover root password using Host Profiles VMware

Friday, November 24, 2017 0
VMware Update or Recover root password using Host Profiles.
Create the Host Profile


1. Right click any host in your inventory (it doesn’t matter which), choose Host Profile, then Create Profile from Host.


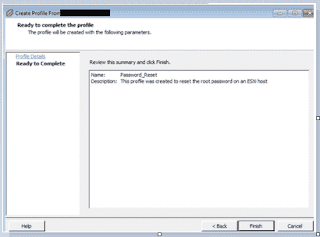
2. Name the Host Profile and give it a description. Click Next.

3. Click Finish to create the Host Profile.

Configure the Host Profile
I. Open Host Profiles.


II. Right-click the Host Profile and choose Edit Profile.

III. Expand Security Configuration, choose Administrator password
    Choose Configure a fixed administrator password, type in the password twice, then click OK.


IV. Right-click the Host Profile and choose Enable/Disable Profile Configuration.

V. Uncheck everything in the Host Profile configuration except the Security Configuration, click OK.

a. Apply the Host Profile to the ESXi Host (or vSphere Cluster)

b. Right click any host in your inventory, choose Host Profile, then Manage Profile.

c. Choose the Password_Reset Host Profile, click OK.

d. Right click any host in your inventory, choose Host Profile, then Apply Profile.

e. Recheck the changes to be applied, click Finish

Log In
     Log in with the new password. If the setting has been changed successfully, you should be able to log in with the new password immediately.


Thursday, November 23, 2017

for loop command for grep the particular file system from list of servers.

Thursday, November 23, 2017 0

Double For loop command for grep the particular file system (mount point) from list of servers.

Here,
 servers       -  contains server list
 fmount        -  mount point

Run the below command. It will login to the list of server and search the mount point and print the output.

#for j in `cat servers`; do for i in `cat fmount`; do echo $j; ssh $j df -hP | grep -i $i; done; done

Modify the variable as per your needs.

Openldap user password reset by using Phpldapadmin

Thursday, November 23, 2017 0
Follow the below steps to Reset Openldap User password by using Phpldapadmin

Login to phpldapadmin admin console by using Admin id & password.

Explore the ldap directory & search the user in left side
Select the user and click
Right side we can see the user property.


Update the password directly here.

Finally update the object.

Tuesday, November 21, 2017

LVM Interview questions and answers Linvirtshell

Tuesday, November 21, 2017 0
1.Is it possible to increase the logical volume?

 Yes. LVM has the feature to increase the volume without unmount it.


2.How to reduce the logical volume? is it possible to reduce an online?

No. we can't reduce the logical volume an online. Here is the steps to reduce the logical volume.

Un-mount the filesystem
Run e2fsck on the volume device
Reduce the Filesystem using resize2fs
Reduce the logical Volume using lvreduce
Mount the filesystem back.


3.How do you scan the new LUN or disk for LVM physical volume?

Use pvscan to scan existing physical volume from newly connected SAN or DISKS.


4.How to scan disks for existing volume group?

vgscan is used to scan existing volume group from newly connected SAN or DISKS.
But we should use pvscan prior to executing this command.


5.How to scan a logical volume from exising volume group?

lvscan command is used to scan.


6.How to stop the logical volume? or deactivate the logical volume?

#lvchange -an /dev/vg_name/lv_name

-a  - activate
 n   - no


7.How to activate the logical volume which is in deactivated state?

#lvchange -ay /dev/vg_name/lv_name

-a - activate
 y - yes


8.How to disable the volume group? or Deactivate the volume group?

#vgchange -an volume_group_name

-a  - activate
 n   - no

9.How to enable the volume group? or Activate the volume group?

#vgchange -ay volume_group_name

-a - activate
 y - yes

10.How do you find, what are the disks are used for logical volume mirroring?
 

[root@testserver archive]# lvs -a -o +devices
  LV       VG         Attr   LSize  Origin Snap%  Move Log Copy%  Convert Devices
  LogVol00 VolGroup00 -wi-ao 32.00G                                       /dev/xvda2(0)
  LogVol01 VolGroup00 -wi-ao 17.88G                                       /dev/xvda2(1024)


11. What are steps to perform in order to increase the logical volume?

  Extend the logical volume
   Increase the Filesystem size
   Verify the status using df command or lvs command.

12.How to list the imported volume groups?

 vgs command to display the imported volume group.


13.How to list the available logical volumes on the system?

  lvs command to list the available logical volumes on the system.

14.How to list the available physical volumes in LVM?

  pvs command to list the available physical volumes.


15.How to see the detailed volume group information?

  [root@testserver archive]# vgdisplay VolGroup00
  --- Volume group ---
  VG Name               VolGroup00
  System ID
  Format                     lvm2
  Metadata Areas        1
  Metadata Sequence No  3
  VG Access               read/write
  VG Status                resizable
  MAX LV                    0
  Cur LV                      2
  Open LV                   2
  Max PV                    0
  Cur PV                     1
  Act PV                      1
  VG Size                49.88 GB
  PE Size                32.00 MB
  Total PE                 1596
  Alloc PE / Size       1596 / 49.88 GB
  Free  PE / Size       0 / 0
  VG UUID               ZfQCQ1-suTc-ykV9-TwvN-ACpB-XcEM-NuWlnE


16.How to see the detailed logical volume information?

 #lvdisplay /dev/centos/root

17.How to see the detailed physical volume information?

  pvdisplay /dev/disk_name

18.How to rename volume Group? can we rename the VG an online?

Its possible to rename the volume group an online. But the mounted volumes will not reflect the same unless you re-mount the volume with new VG name. Need to update the /etc/fstab with new VG name.

19.How to take a LVM configuration backup?

 vgcfgbackup vg_name  to take the latest configuration backup of volume group. The default volume group backup location is  /etc/lvm/backup.

20.How to re-create the device files for LVM volumes?

 vgmknodes to recreate the LVM devices files

21.Brief about lvmdump.

 lvmdump is tool for LVM2 to collect the various information for diagnostic purposes.By default, it creates a tarball suitable for submission along with a problem report

22.How are snapshots in LVM2 different from LVM1 in Redhat Linux?

LVM1 snapshots are readonly by default where LVM2 snapshots were read/write.
 

23.What are the steps involved to create the logical volume from scratch?
 

Create a physical volume using pvcreate command.
   #pvcreate /dev/sdc

Create a volume group using "vgcreate" command
   #vgcreate centos /dev/sdc

Create a logical volume using "lvcreate" command
   #lvcreate -L 100M -n vol1 centsos

Create a filesystem on logical volume using mkfs command.
    #mkfs -t ext4 /dev/centos/vol1

Mount the filesystem using mount command for use.
    #mount -t ext4 /dev/centos/vol1 /vol1
 

24.How to extend the volume group?

 vgextend we can increase the volume group.


25.Assume Volume group "centos" is already exists. How do you extend the volume group with 100GB? Provide all the steps with commands.

   1.Get the 100GB lun from storage team.(/dev/sdd)
   2.Create physcical volume ( # pvcreate /dev/sdd )
   2.Extend the volume group (# vgextend centos /dev/sdd)

26.If the centos has two physical volumes called /dev/sdc/ & /dev/sdd. How do you remove /dev/sdd from centos.

 vgreduce command will help to reduce, but we need to unmount the lv related to this vg & deactivate the same. Then we can use below command.
 vgreduce centos /dev/sdd/


27.How to decommission/remove LVM completely from the server?

     1.Un-mount all the logical filesystems
     2.Remove the logical volumes using "lvremove" command.
     3.Destroy the volume group using "vgremove" command.
     4.Use "pvremove" command remove the physical volumes from the system.


28. Why LVM is required in Linux Server?

LVM stands for Logical Volume Manager , to resize filesystem's size online we required LVM partition in Linux. Size of LVM partition can be extended and reduced using the lvextend & lvreduce commands respectively.


29. How create partition from the raw disk - Brief.

Using fdisk utility we can create partitions from the raw disk.Below are the steps to create partition from the raw disk :
- fdisk /dev/hd* (IDE) or /dev/sd* (SCSI)
- Type n to create a new partition
- After creating partition , type w command to write the changes to the partition table.

Monday, November 20, 2017

lsof command with example - Linvirtshell

Monday, November 20, 2017 0

The lsof is an excellent utility that can be used to identify process or user that is locking system resource such as file or network socket.

Basically, the /etc/services system files is usually used to map a numeric port number to a descriptive port name defined by user.

In the absence of any options, lsof lists all open files belonging to all active processes.

NAME

       lsof - list open files

To report all processes that are accessing the TCP sockets found on the system
#lsof -i TCP

To find out what process is holding TCP port 22
#lsof -i tcp:22

To show all resources that are being held by process id 2057
#lsof -p 2057

To find out what are the resources held by all cron processes. 
#lsof -o crond

To confirm resources that are being held by user id user linuser
#lsof -u linuser| more

To find out what are the processes that are locking the specify file /usr/sbin/anacron
# lsof /usr/sbin/anacron

Listing the files, any of whose IPv4 & IPv6 Internet address matches
# lsof -i4 -i6

Checking the count of open files
# lsof | wc -l

Listing of NFS files
#lsof -N

Hope it helps

Saturday, November 18, 2017

VM Tools version by using Powercli command - Vmware

Saturday, November 18, 2017 0
Use the below command to get the VM tools version.

get-vm |% { get-view $_.id } | select Name, @{ Name=";ToolsVersion";;

Expression={$_.config.tools.toolsVersion}}


Friday, November 17, 2017

Error "system was unable to find a physical volume" SOLVED -Step by Step

Friday, November 17, 2017 0

If we get Error  "system was unable to find a physical volume" . It needs  to restore  the corrupted Volume Group


Situation :

If the volume group metadata area of a physical volume is accidentally overwritten or otherwise destroyed, you will get an error message indicating that the metadata area is incorrect, or that the system was unable to find a physical volume with a particular UUID. You may be able to recover the data the physical volume by writing a new metadata area on the physical volume specifying the same UUID as the lost metadata.

Solution:

The following example shows the sort of output you may see if the metadata area is missing or corrupted.

[root@test]# lvs -a -o +devices

  Couldn't find device with uuid 'zhtUGH-1N2O-tHdu-b14h-gH34-sB7z-NHhkdf'.
  Couldn't find all physical volumes for volume group VG.
  Couldn't find device with uuid 'zhtUGH-1N2O-tHdu-b14h-gH34-sB7z-NHhkdf'.
  Couldn't find all physical volumes for volume group VG.

  ...

You may be able to find the UUID for the physical volume that was overwritten by looking in the /etc/lvm/archive directory. Look in the file VolumeGroupName_xxxx.vg for the last known valid archived LVM metadata for that volume group.

Alternately, you may find that deactivating the volume and setting the partial (-P) argument will enable you to find the UUID of the missing corrupted physical volume.

[root@test]# vgchange -an --partial

  Partial mode. Incomplete volume groups will be activated read-only.
  Couldn't find device with uuid 'zhtUGH-1N2O-tHdu-b14h-gH34-sB7z-NHhkdf'.
  Couldn't find device with uuid 'zhtUGH-1N2O-tHdu-b14h-gH34-sB7z-NHhkdf'.

  ...

Use the --uuid and --restorefile arguments of the pvcreate command to restore the physical volume. The following example labels the /dev/sdh1 device as a physical volume with the UUID indicated above, zhtUGH-1N2O-tHdu-b14h-gH34-sB7z-NHhkdf. This command restores the physical volume label with the metadata information contained in centos_00000-1802035441.vg, the most recent good archived metatdata for volume group .

The restorefile argument instructs the pvcreate command to make the new physical volume compatible with the old one on the volume group, ensuring that the the new metadata will not be placed where the old physical volume contained data (which could happen, for example, if the original pvcreate command had used the command line arguments that control metadata placement, or it the physical volume was originally created using a different version of the software that used different defaults).

The pvcreate command overwrites only the LVM metadata areas and does not affect the existing data areas.

[root@test]# pvcreate --uuid "zhtUGH-1N2O-tHdu-b14h-gH34-sB7z-NHhkdf" --restorefile /etc/lvm/archive/centos_00000-1802035441.vg /dev/sdh1
  Physical volume "/dev/sdh1" successfully created

You can then use the vgcfgrestore command to restore the volume group's metadata.

[root@test]# vgcfgrestore VG
  Restored volume group VG 

You can now display the logical volumes.

[root@test]# lvs -a -o +devices

  LV     VG   Attr   LSize   Origin Snap%  Move Log Copy%  Devices

  stripe VG   -wi--- 300.00G                               /dev/sdh1 (0),/dev/sda1(0)
  stripe VG   -wi--- 300.00G                               /dev/sdh1 (34728),/dev/sdb1(0) 

The following commands activate the volumes and display the active volumes.

[root@test]# lvchange -ay /dev/VG/stripe
[root@test]# lvs -a -o +devices

  LV     VG   Attr   LSize   Origin Snap%  Move Log Copy%  Devices
  stripe VG   -wi-a- 300.00G                               /dev/sdh1 (0),/dev/sda1(0)
  stripe VG   -wi-a- 300.00G                               /dev/sdh1 (34728),/dev/sdb1(0)

If the on-disk LVM metadata takes as least as much space as what overrode it, this command can recover the physical volume. If what overrode the metadata went past the metadata area, the data on the volume may have been affected. You might be able to use the fsck command to recover that data